How to Use Siri on Your HomePod
Siri is enabled by default on the Apple HomePod, but extra steps are required to access personalized features like making calls and playing music. Here, we show you how.

The Apple HomePod and HomePod mini come with Siri pre-installed, making it easy to start using your voice assistant right out of the box. However, to unlock additional features and create a more personalized experience, you need to turn on "Personal Requests" and "Recognize My Voice" through the Home app on your iPhone, iPad, or Mac.
In this guide, we will walk you through the process of using Siri on your HomePod and provide step-by-step instructions on enabling these extra settings, allowing you to get the most out of your smart speaker.
Finally, we’ll show you how to use your HomePod to get temperature readings and use Find My to locate friends and lost items.
How to talk to Siri on your HomePod
There are two ways to activate Siri on the HomePod.
- Say “Siri” or “Hey Siri”.
- Press the top of the HomePod.
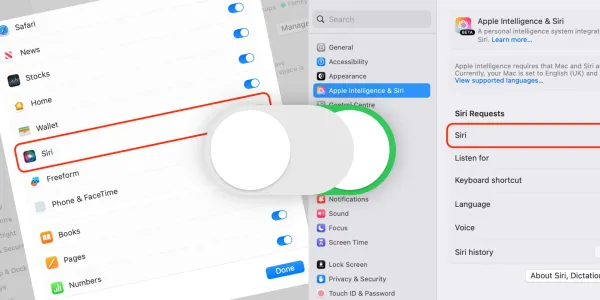
If Siri doesn’t work, or you have previously turned Siri off on your HomePod, check the following settings.
- Open the Home app on your iPhone.
- Tap and hold your HomePod’s icon (right-click on a Mac) until an options list appears.
- Tap on Accessory Settings.
- Scroll down to Siri options and ensure Listen for “Siri” or “Hey Siri” is turned on, by selecting “Siri” or “Hey Siri” or “Hey Siri”.
- Make sure Touch and Hold for Siri is toggled on.
- Tap X to close the settings screen.

Siri should now be working, and you can ask basic questions, such as:
Siri, what’s the weather today?
Siri, what’s the capital of Canada?
But you need to enable voice recognition to access more of Siri’s capabilities.
Why you should enable voice recognition on your HomePod
In your HomePod’s default state, you can access basic information, such as the local weather, or use Siri Knowledge. However, the true potential of Siri on your HomePod is revealed when you enable voice recognition, specifically the Recognize My Voice and Personal Requests features. These two options significantly enhance your experience with the smart speaker, but what exactly do they do?
Recognize My Voice
With Recognize My Voice enabled, Siri will learn to identify your voice. You can then access your Apple Music library, use Find My, and control accessories from your HomePod.
So for example, if you walk into a room and ask your HomePod:
Siri, play my party playlist.
Siri will know it is you talking and play the appropriate playlist from your Apple Music account.
Personal Requests
Personal Requests, enabled alongside voice recognition, allow you to access information from apps like Messages, Reminders, Contacts, Calendar, Notes, and others on your iPhone or iPad. So you can use your HomePod to send messages, make calls, manage your calendar, create reminders and notes, and run Siri Shortcuts on your iOS device.
You can ask something like:
Siri, remind me to turn off the lights at 9 pm.
Siri will recognize your voice and be able to add your request to your reminders.
How to set up Recognize My Voice and Personal Requests on your HomePod
For Personal Requests to work, your iPhone must be on the same Wi-Fi network as your HomePod, and you must be signed in to iCloud with the same Apple Account on both devices.
To set up Recognize My Voice and Personal Requests on your HomePod, follow these steps:
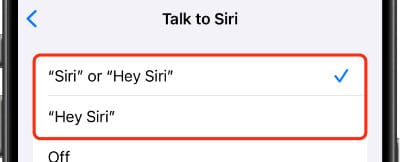
Step 1: Check if “Siri or Hey Siri” is enabled on your iPhone
- Connect your iPhone to the same Wi-Fi network as the HomePod.
- Open Settings on your iPhone.
- Scroll down and tap on Siri then Talk to Siri.
- Check that “Siri” or “Hey Siri” or “Hey Siri” is selected.
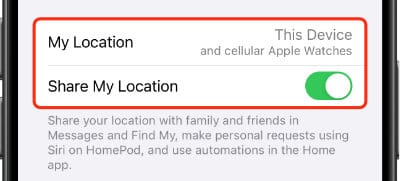
Step 2: Check you are sharing your location
- Go to Settings > Your Account Name > Find My.
- Check that Share My Location is toggled on, and My Location is set to This Device.
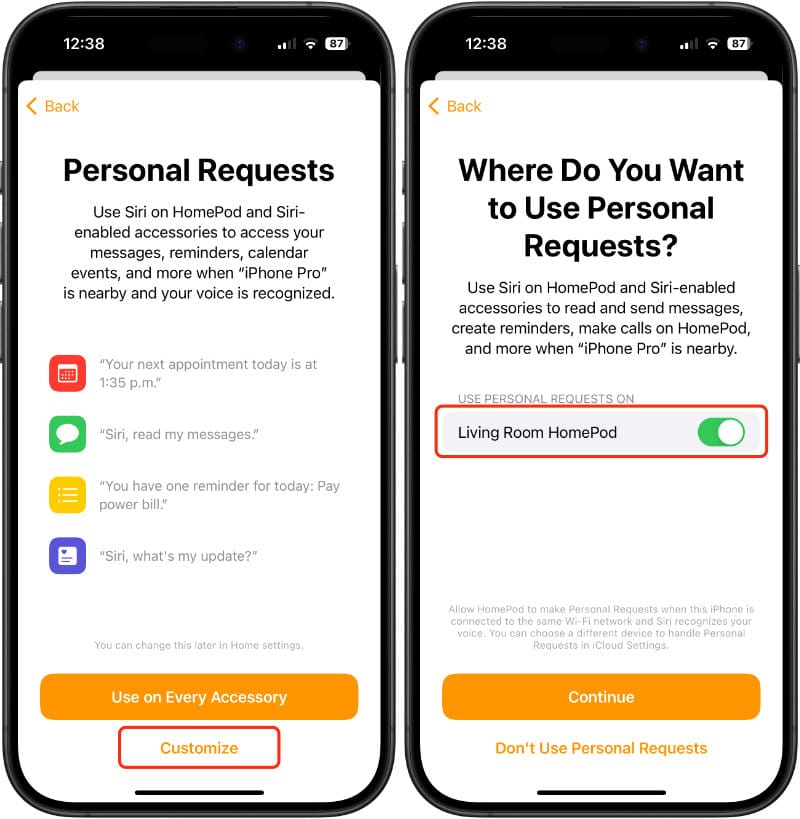
Step 3: Turn on Personal Requests in the Home app
- Open the Home app and tap the ellipsis (three small dots in a circle) at the top right of the screen.
- Tap on Home Settings.
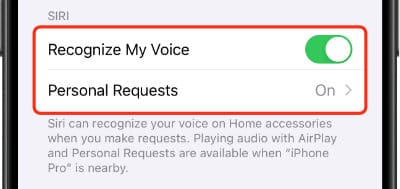
- Tap on your user profile name under People, then toggle on Recognize My Voice.
- Tap Continue on the slide over that appears.
- If you have multiple HomePods and want to turn on Personal Request for all of them, tap Use on Every Accessory; otherwise, tap Customize to select which devices are enabled.
After completing these steps, Siri on your HomePod will recognize your voice and provide personalized responses.
To test it out, try some of these commands:
Siri, read my messages.
Siri, do I have any appointments today?
Siri, play my relaxation playlist.
How to add new people to your HomePod
If other members of your household would like to use a HomePod and have access to their own personal requests, you can teach Siri to recognize their voices, too.
First, you need to invite each new user to join your home from the Home app.
- Open the Home app and tap the ellipsis (three small dots in a circle) at the top right of the screen.
- Tap on Home Settings.
- Tap on Invite People.
- Enter the person’s Apple Account details and tap to send the invite.
The person will then need to open the Home app on their device and accept the invitation.
How to ask Siri on a HomePod for temperature and humidity readings
The HomePod 16.3 software update enabled the temperature and humidity sensors in the HomePod Mini (yes, they’ve always been there!) and the second-generation HomePod.
This means you can ask Siri for climate information in rooms that contain a HomePod.
Siri, how warm is it in here?
Siri, what’s the temperature in the bedroom?
Climate readings are integrated with Apple HomeKit, so smart devices around your home can be controlled using temperature criteria. For example, if a room reaches a certain temperature, a fan can be turned on, or the heating can be turned on if it drops too low.
If you have two HomePods connected as a stereo pair, Siri will give you a temperature or humidity range based on the readings from each device.

How to find friends, family, and items with Siri on a HomePod
The HomePod 16.3 update also added the ability to track friends and family who have shared their location with you and items you have added to the Find My network, such as AirTags.
You can ask Siri where someone – or something – is by saying:
Siri, where is Dad?
Siri, where are my keys?
Siri will respond with an approximate location or address if available.
What to do if Siri doesn’t recognize your voice
In households where multiple people use Siri on the HomePod, you might sometimes be asked to identify yourself when making a personal request. Siri will ask, "Who is this speaking?" If it happens frequently, you can include your name at the beginning of your request. For example, you can say:
Siri, this is Sarah. Do I have any meetings today?
If Siri still has difficulty consistently recognizing your voice, you can reset the Recognize My Voice feature and retrain it for better accuracy.
- Open the Home app and tap the ellipsis (three small dots in a circle) at the top right of the screen.
- Tap on Home Settings.
- Tap on your user profile name under People, then turn Recognize My Voice off, and then on again.
Other options are to restart your iPhone and your HomePod and, as a last resort, set up “Hey Siri” on your iPhone again.